How To Install the Add-on

After purchasing the add-on, you can download it for installation in your website.

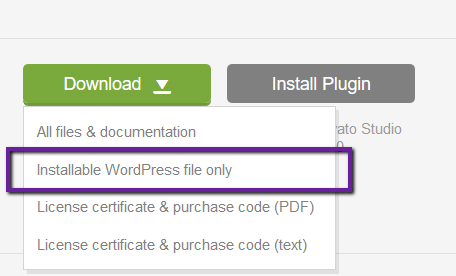
Step 1. Go to CodeCanyon.net Downloads section here and find the Image Caption Hover Effects Add-on and click download Installable WordPress file only option.

WordPress Installable File Only

Step 2. Now login to your WordPress website and navigate to Dashboard -> Plugins -> Add New section and upload the ZIP file of the add-on that was downloaded earlier.

Step 3. After installation process, click Activate and the add-on is ready to use.

Read below for a detailed description of all element options.

Element Location

Location: The Element is highlighted in the Fusion Builder Elements.

Image Caption Hover Element Screen

Element Options

  • A – Select a Hover Effect Type of your choice from 7 different options.

  • B – Upload the Image that will be used for the Hover Effect.

  • C – Set a Background Color to be used for the Hover Effect.

  • D – Set a Title for the Image Hover Effect. This will show on hover.

  • E – Set the font size in a valid CSS unit value.
  • F – Define the font color for the Title.

  • G – Set a Subtitle for the Image Hover Effect. This will show on hover.

  • H – Set the font size in a valid CSS unit value.

  • I – Define the font color for the Subtitle.

  • J – Choose the option to Show or Hide Button for the Image Hover Effect.

  • K – Set the text for the Button.

  • L – Define a valid URL for the Button. For example, http://www.google.com/
  • M – Select the text color of the Button.

  • N – Select the background color of the Button.

  • O – Set a CSS Class to wrap the element in a Custom CSS Class.

Mobile Tab

Image Caption Hover Effects Options-Mobile
  • A – Enable this option to show hover content by default.
  • B – Set the font size in a valid CSS unit value.
  • C – Set the font size in a valid CSS unit value.

Image Caption Hover Element Parameters

Copy to Clipboard
  • wz_hover_style – Choose from cs-style-1, cs-style-2, cs-style-3, cs-style-4, cs-style-5, cs-style-6or cs-style-7.
  • wz_hovereffects_front_image – Set the image URL for this parameter.
  • wz_hovereffects_hovercolor – Define a background color for the Hover in hex color value like #000000.
  • wz_hovereffects_title – Set a text only title.
  • title_size – define a font size value for the title. e.g. 20
  • wz_hovereffects_titlecolor – Define a text color for the Title in hex color value like #000000.

  • wz_hovereffects_subtitle – Set a text only subtitle.
  • sub_title_size – define a font size value for the title. e.g. 20
  • wz_hovereffects_stitlecolor – Define a text color for the subtitle in hex color value like #000000.

  • wz_hovereffects_showbutton – Choose yes or no to show or hide the button
  • wz_hovereffects_buttontext – Set a button text.
  • wz_hovereffects_buttonurl – Define a valid URL for the Button. For example, http://www.google.com/
  • wz_hovereffects_buttontextecolor – Define a text color for the button in hex color value like #000000.
  • wz_hovereffects_buttonbg – Sets the background color for the Button in hex color value like #000000.
  • wz_hovereffects_extra_class – Set a Custom CSS Class in this parameter.
  • wz_hovereffects_mdefaulthover – Set to Yes to show hover content by default OR No to keep the hover effect.
  • mobile_title_size – define a font size value for the title in mobile layout. e.g. 20
  • mobile_sub_title_size – define a font size value for the subtitle in mobile layout. e.g. 20